Complete Guide to Camera VicoHome 192.168.0.153
If you’ve recently purchased a VicoHome security camera and noticed the IP address 192.168.0.153 appearing during setup or device connection, you’re in the right place. This guide will help you understand what that address means, how to get your camera fully set up, and how to troubleshoot common problems. Whether you’re a beginner or looking to integrate your VicoHome camera into a smart security system, this comprehensive guide covers it all in a simple, friendly format.
1. Introduction to Camera VicoHome 192.168.0.153
The Camera VicoHome 192.168.0.153 refers to a VicoHome smart camera that has been assigned this IP address by your local Wi-Fi network. This address is essential for network communication but isn’t typically used for direct login via browser. VicoHome cameras are designed to be user-friendly, app-driven devices that help homeowners monitor their surroundings through smart alerts, live streaming, and video recording.
Local IPs like 192.168.0.153 are private and only function within your home network. The address allows the VicoHome camera to communicate with your router, smartphone app, and other smart devices.
2. Getting Started with Your VicoHome Camera
The first step in using your VicoHome camera is downloading the VicoHome mobile app, which is available on both Android and iOS platforms. After installation, you’ll be prompted to register or log in to your account.
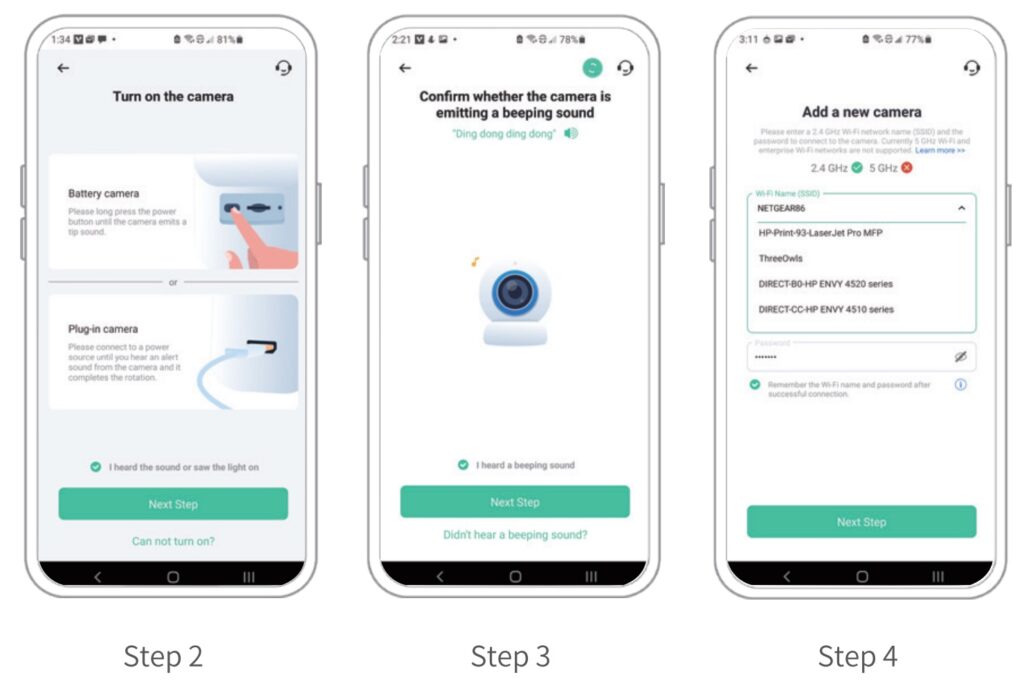
Once you’re logged in, follow these steps:
- Power on the camera (usually by holding the power button for a few seconds).
- Launch the app and click on “+” to add a new device.
- Follow the on-screen instructions to pair the camera via QR code or Bluetooth.
During this process, your camera will connect to your Wi-Fi network. Once connected, your router will assign it a local IP address like 192.168.0.153, which you’ll see in the app under device information.
3. Wi-Fi Network Requirements
VicoHome cameras only work on 2.4GHz Wi-Fi networks. This is important to know, as many modern routers offer dual-band (2.4GHz and 5GHz) support. Make sure your smartphone and camera are both connected to the 2.4GHz band during setup.
Common Wi-Fi setup issues include:
- Incorrect Wi-Fi password
- Camera too far from router
- Network set to 5GHz only
- MAC address filtering enabled on the router
To avoid these issues, it’s a good idea to move the camera close to the router during setup and disable any unnecessary network restrictions.
4. Understanding 192.168.0.153 and Browser Access
Many users wonder whether they can access the camera via a web browser using its IP address, like http://192.168.0.153. Unfortunately, VicoHome cameras are designed to be controlled and accessed exclusively through the mobile app.
This means typing the IP address into a browser will not bring up a control panel. The IP address is primarily useful for network diagnostics and, in some advanced models, for enabling RTSP streaming or integration with third-party software.
If you access this address from a browser and see a blank page or error, that’s normal—it doesn’t mean the camera is broken.
5. Live View & RTSP Streaming (If Supported)
Once the camera is connected and visible in the app, you can access its live stream at any time. The app provides features like zoom, two-way audio, snapshot, and video recording.
For advanced users, some models support RTSP (Real-Time Streaming Protocol), which allows the feed to be accessed through third-party applications like VLC or NVR systems. To enable RTSP:
- Go to the app settings for the camera.
- Enable RTSP/Onvif (if your model supports it).
- Note the RTSP stream URL (typically in the format
rtsp://192.168.0.153:554/stream)
Check your camera’s documentation or settings page to see if this is an option.
6. Storage Options: Cloud and SD Card
VicoHome cameras support both cloud storage and local Micro-SD cards. If you prefer not to use the cloud service, inserting an SD card (usually up to 128GB) enables local video storage.
Comparison Table:
| Feature | Cloud Storage | SD Card Storage |
|---|---|---|
| Access from anywhere | Yes | Only when on same network |
| Storage limits | Based on subscription | Depends on card size |
| Monthly cost | Yes | No |
| Data recovery | Easy | SD card can be damaged |
You can manage storage settings from the app, set event-based recording, or even continuous recording (if supported).
7. Sharing Camera Access
Want your family or roommates to monitor the camera too? You can share access via the app by generating a QR code that others can scan to view the camera.
In the VicoHome app:
- Open the camera settings.
- Tap on “Share Device.”
- Choose the QR or link option.
Users with shared access can watch the live feed but might have limited permissions unless you allow full access.
8. Installation & Mounting Tips
Proper camera placement is key for optimal performance. VicoHome cameras are typically weatherproof and can be used both indoors and outdoors.
Here are some tips:
- Mount 6–10 feet above ground
- Angle the lens 15 degrees downward
- Avoid direct sunlight into the lens
- Use screws and anchors for permanent outdoor placement
Most cameras come with adjustable mounts and accessories to help secure them in place.
9. Power Supply & Charging
VicoHome cameras either run on rechargeable batteries or a wired power connection. If your model has a built-in battery, you can charge it using a USB Type-C or Micro-USB cable (usually 5V/1.5A).
Charging Tips:
- Full charge typically takes 8–10 hours
- Red LED = Charging
- Green LED = Fully charged
Some models also support solar panel attachments for continuous power.
10. Troubleshooting Camera VicoHome 192.168.0.153
If you’re having issues with your VicoHome camera or its IP address 192.168.0.153, try these troubleshooting steps:
Issue: Camera Offline
- Check if the camera has power
- Reboot your router
- Make sure your Wi-Fi signal is strong
Issue: Can’t View Live Feed
- Update the VicoHome app
- Confirm camera is online in device list
- Restart the camera via power button
Issue: Camera IP Changed
- Your router may assign a new IP if DHCP is enabled. Use the app to find the current IP.
- Reserve a static IP in your router’s settings for consistent access.
11. Smart Integrations and Features
Modern VicoHome cameras support smart AI features such as:
- Motion detection
- Human and animal recognition
- Sound alerts
- Activity zones for focused monitoring
Some models also integrate with smart home assistants like Amazon Alexa and Google Assistant, allowing you to display the feed on a smart display.
To set this up, go to the VicoHome app → Settings → Smart Integration.
12. Final Thoughts on Camera VicoHome 192.168.0.153
The Camera VicoHome 192.168.0.153 is a reliable and user-friendly device that offers smart surveillance features, flexible storage options, and mobile-first control. Understanding the role of the IP address 192.168.0.153 helps you better manage connectivity, security, and streaming capabilities.
Whether you’re using this camera for home security, baby monitoring, or pet watching, VicoHome delivers great value, especially when you take full advantage of the app’s features. Keep your firmware updated, your Wi-Fi secure, and your camera well-positioned for the best results.
If you ever run into issues, remember that the VicoHome app, customer support, and this guide will be here to help.
Other Articles
Aksano Corp Cameras WiFi Purchase
Rowland St & S Barranca Ave Red Light Camera


Post Comment